

Arun Kumar
Arun Kumar is an SEO specialist and founder of Digi Arun with 6+ years of experience in technical SEO, local SEO, content optimization, and search strategy. He helps businesses improve organic visibility through data-driven SEO strategies and regularly works with Google Search Console, Google Analytics, Ahrefs, Semrush, and Screaming Frog.
Disclosure: Digi Arun may earn a commission if you buy through links on this page, at no extra cost to you.
How do I buy web hosting? You choose a hosting type, compare plans by total cost including renewal, pick a domain and billing term, pay, and then connect your domain. It sounds simple, yet many first-time buyers in India overpay, because the advertised monthly rate hides a long prepayment and a much higher renewal price. This guide is for first-time site owners, freelancers, and small businesses. It follows each step in order, uses the real numbers from Hostinger India’s own pricing page, and explains when a different plan or provider may suit you better. By the end, you will have chosen a plan, completed a purchase, and connected your domain.
TL;DR
- The process: choose a hosting type, compare total cost including renewal, pick a domain and billing term, buy, connect your domain, and launch.
- Most beginners start with shared hosting. The advertised price is a prepaid long-term rate, and renewal is higher.
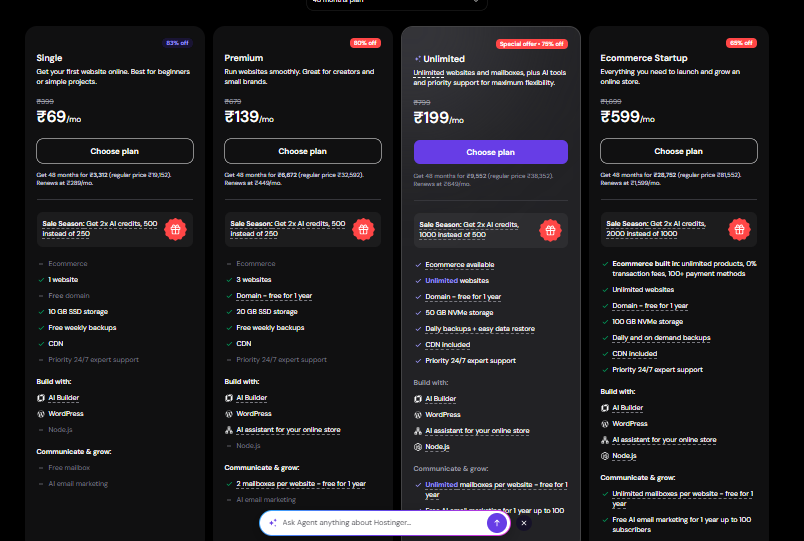
- On Hostinger India, Premium is ₹139 a month on a 48-month term (₹6,672 upfront, before GST) and renews at ₹449 a month. Checked October 26, 2026.
How Do I Buy Web Hosting? The Process at a Glance
| To buy web hosting, decide which type you need, compare providers on total cost including renewal, choose a domain and billing term, create an account and pay, then connect your domain and install your site. Most beginners start with shared hosting and upgrade only when the site outgrows it. |
- Decide what type of hosting you need.
- Compare providers and plans by total cost, not monthly price.
- Choose your domain and billing term.
- Create an account and pay with your preferred method.
- Open your control panel and note your login details.
- Connect your domain to your hosting.
- Install your site, confirm SSL, and apply basic security settings.
Hosting is the service that stores your website’s files and makes them available online. Without it, nobody can visit your site. A domain is the address, and hosting is the home.
Before you start, keep four things ready: a payment method, an email address you check regularly, one or two domain name ideas, and a rough idea of how many websites you plan to run. Having these ready makes the checkout steps quicker and reduces the chance of rushing into a plan you do not need.
This order protects you from the most common mistake: paying for a long term before you know what the renewal costs. The sections below follow these steps one by one.
Step 1: Decide What Type of Hosting You Need
| Shared hosting suits most new, low-traffic sites. Managed WordPress hosting suits WordPress owners who want built-in tools. VPS and cloud hosting suit growing or resource-heavy sites that need dedicated resources. Choose by traffic, technical skill, and budget, not by the lowest advertised price. |
| Type | What it is | Best for | Not ideal for | Skill needed |
| Shared | Many sites share one server’s resources. | New blogs, portfolios, small business sites | High-traffic stores, resource-heavy apps | Low |
| Managed WordPress | Shared-style hosting with WordPress tools such as one-click install. | WordPress owners who want less maintenance | Non-WordPress projects with custom needs | Low |
| VPS | A virtual server with dedicated resources and full root access. | Developers and custom applications | Beginners who do not want to manage a server | High |
| Cloud | Your site runs across multiple virtual servers for steadier performance. | Agencies, busy sites, growing stores | Small personal sites needing basic hosting | Medium |
Two details change the answer more than any others. The first is how many websites a plan allows, because limits differ sharply between tiers. The second is whether backups run daily or weekly, because for a business site, a lost day of orders or content matters.
Answer these five questions before you pick a type:
- How many websites will you run? One or two points to a basic shared plan. Many sites point to a plan with unlimited sites.
- How much traffic do you expect in year one? Low traffic fits shared hosting. Heavy or sudden traffic points to cloud or VPS.
- Will you sell products online? Stores need steadier resources and reliable backups.
- Do you need daily backups? Check how often each plan backs up your site, because the cheapest tiers often back up weekly.
- Are you comfortable managing server settings? If not, avoid VPS.
Hostinger describes its web hosting as managed, with LiteSpeed technology, which means the company handles server maintenance, security updates, and backups. That removes most technical chores for beginners. Higher tiers add resources rather than new skills.
If you run one site with low traffic and no store, start with the cheapest shared plan that fits. If you run client sites or a store, look at higher tiers. Hostinger’s page says you can upgrade to cloud hosting later, so starting small is a safe choice.
Step 2: Compare Hosting Providers and Plans
| Compare hosts on the total cost over the full term including renewal, plus backups, SSL, support, resource limits, and migration help. The advertised monthly price is usually a prepaid long-term rate, so check what you pay upfront and what the plan renews at before buying. |
| Criterion | What it means | What to check |
| Total cost | What you pay over the whole term, with taxes | Upfront total, not the monthly figure |
| Renewal price | The rate after the first term ends | The renewal line under each plan |
| Performance and location | Speed and where the server sits | Server location options for your audience |
| Backups | How often your site is copied | Weekly or daily, and whether restore is easy |
| SSL | The certificate behind the padlock | Free and automatic, or paid |
| Support | Help when something breaks | Channels and hours of support |
| Resource limits | Storage, sites, and usage caps | “Unlimited” claims and the fair usage policy |
| Migration | Moving an existing site | Free, assisted, or self-service |
| Refund terms | Your exit if the host disappoints | Refund window and exclusions |
Learn to read a pricing page before you compare. Hostinger India shows Premium at ₹139 a month, next to a crossed-out ₹679. The fine print says you get 48 months for ₹6,672 and that the plan renews at ₹449 a month. The page also states that all plans are paid upfront, so ₹139 is the total divided by 48 months, not a monthly bill. The crossed-out regular price is not your renewal price.
Add a quick sanity check to every quote. Multiply the monthly price by the number of months to get the upfront total. Then multiply the renewal price by twelve to see your first renewal year. For Hostinger’s Premium plan, that gives ₹6,672 now and ₹5,388 for the first year after the term, both before GST.
Is Cheap Web Hosting Reliable?
| Cheap hosting can be reliable for small, low-traffic sites, but the low price usually requires a long prepaid term and renews higher. Judge reliability by uptime terms, support access, backups, and resource limits, not by price alone, and always read the refund policy first. |
- Uptime terms: read the hosting agreement, and look for a public system status page. Hostinger links to one.
- Backups: Hostinger lists weekly backups on Single and Premium, and daily backups on Unlimited and Cloud Startup.
- Resource limits: “unlimited” features on Hostinger are subject to its Fair Usage Policy, and a separate page lists CPU, RAM, and disk limits per plan.
- Migration: Hostinger lists free, unlimited website migration with no downtime, which matters if you move your site later.
- Support and refunds: Hostinger lists 24/7 support and a 30-day money-back guarantee. Read the refund policy for exclusions.
[AUTHOR EXPERIENCE: Has the author run a site on cheap shared hosting? Add one honest observation about speed or support.]
How Much Does Web Hosting Cost in India?
| On Hostinger India, shared plans cost ₹69 to ₹199 per month on a 48-month term, checked October 26, 2026, before GST. Cloud Startup is ₹599. Renewal rates are higher, from ₹289 to ₹649 per month on shared plans. Compare each host’s own page, because prices change during sales. |
| Plan | Price per month (48-month term) | Pay upfront for 48 months | Renews at (per month) | First renewal year (12 × renewal) |
| Single | ₹69 | ₹3,312 | ₹289 | ₹3,468 |
| Premium | ₹139 | ₹6,672 | ₹449 | ₹5,388 |
| Unlimited | ₹199 | ₹9,552 | ₹649 | ₹7,788 |
| Cloud Startup | ₹599 | ₹28,752 | ₹1,599 | ₹19,188 |
Hostinger’s page states that prices are listed without GST, so your final total will be higher. [SOURCE: GST rate and final total shown at checkout] The jump at renewal is large: Premium moves from ₹139 to ₹449 a month, about 3.2 times higher. Four years at the published Premium renewal rate would cost ₹21,552 before GST. Cloud Startup moves from ₹599 to ₹1,599 a month, about 2.7 times higher. The table shows entry rates during Hostinger’s Sale Season promotion, and sale prices are time-limited, so the number on your screen may differ. Plan for the renewal figure, not only the sale price.
Step 3: Choose a Domain Name and Billing Term
| You can sometimes buy hosting before registering a domain, but a domain is needed to make your site publicly reachable. Many plans include a free domain for the first year and then charge the standard renewal rate. SOURCE: free domain terms for your chosen plan |
A domain is your website’s address, such as yourbrand.in. Hosting stores your site, and the domain tells visitors where to find it. You need both.
On Hostinger India, the Premium, Unlimited, and Cloud Startup plans list a free domain for one year when you buy a yearly or longer plan. The Single plan is listed inconsistently on the same page. After year one, the domain renews at its normal rate.
Choose a name that is short, easy to spell, and easy to say aloud, and avoid hyphens and numbers where you can. Check availability and the renewal price of your chosen extension, such as .in or .com, before you commit. Hostinger also lists domain privacy among its built-in protections, which keeps your personal details out of public records.
If you already own a domain elsewhere, you can keep it and point it to your host using nameservers. Keeping hosting and domain with one company is simpler to manage. Keeping them apart gives you more independence if you later change hosts.
| Term | Pay upfront | Commitment | Trade-off |
| Monthly or 12 months | [VERIFY: price at checkout] | Low | Higher cost per month, easier exit |
| 24 months | [VERIFY: price at checkout] | Medium | Middle ground on price and commitment |
| 48 months | Premium: ₹6,672 (before GST) | High | Lowest monthly rate shown, largest upfront payment, higher renewal |
Step 4: How to Buy Hosting, Step by Step (Hostinger Walkthrough)
| To buy hosting, pick a plan, choose a billing term, add or connect a domain, create an account, pay, and open the control panel. Review the order summary for add-ons and taxes before paying, because that screen shows the real total you will be charged. |
Disclosure: the links in this section are affiliate links. Digi Arun may earn a commission at no extra cost to you.
Hostinger’s own process is short: select a plan, add it to the cart, choose a subscription period, sign in or sign up, pick a payment method, add your details, and submit payment. The numbered steps below expand each stage with what to look for.
- Open the plan page. Go to Hostinger India’s web hosting page and scroll to the pricing table. Note the term the headline price needs (48 months) and the renewal rate printed under each plan.
- Choose your plan. Click Choose plan on the plan that matches your answers from Step 1. The plan-fit table in the next section shows which tier suits which site.
- Select your subscription period. On the checkout page, pick a billing period. Hostinger says monthly payment is an option but recommends longer plans for better value. Choose a term you are comfortable paying upfront, and note the refund window.
- Sign up or sign in. Create a Hostinger account or log in to an existing one. Use an email address you check regularly, because your receipts and renewal notices arrive there.
- Choose a payment method. Hostinger India’s page shows UPI, RuPay, Visa, Mastercard and PayPal among its accepted methods, with more listed on its payment methods page. [Source: methods available at checkout on your device]
- Review the order and pay. Check the summary for plan, term, add-ons, taxes, and total. Untick extras you do not need. Enter your details and click Submit Secure Payment.
- Receive your login details and open hPanel. After payment you receive login credentials to manage websites, domains, databases, email accounts, and files. Hostinger’s control panel is called hPanel.
After payment, you can manage websites, domains, databases, email accounts, and files from hPanel. If you are moving an existing site, Hostinger says to buy a plan first and then request migration from hPanel.
Hostinger’s plan page states a 30-day money-back guarantee, and its FAQ invites you to try the service risk-free within that window. Treat that as a safety net, not a reason to skip research, and read the refund policy for exclusions.
| Check before you pay Term and upfront total match what you intended.Renewal rate noted, with the date you checked it.GST and any add-ons visible in the order summary.Refund window noted: the plan page states a 30-day money-back guarantee. Payment method works for your card or UPI app.Invoice and login details are saved somewhere safe. |
Ready to buy? Check the current Hostinger India price here: Disclosure: Digi Arun may earn a commission at no extra cost to you.
Step 5: Connect Your Domain and Launch Your Website
| Connect your domain by pointing its nameservers, or DNS records, to your host, then wait for the change to spread, confirm SSL, and install your site. If the domain and hosting are with the same provider, much of this may be automatic. [SOURCE: Hostinger steps for your setup] |
Connecting your domain tells the internet where your new hosting lives. If you bought your domain from Hostinger, the connection is managed inside one account, which Hostinger says makes management easier. If you bought elsewhere, follow the nameserver steps below.
- Find your hosting nameservers. Nameservers are the addresses that tell the internet where your site lives. If your domain is with Hostinger, it connects inside the same account. Otherwise, find the nameservers in hPanel, following Hostinger’s guide on pointing a domain.
- Update the domain at your registrar. Log in where you bought the domain and replace its nameservers with the ones from hPanel. Save the change.
- Wait for the change to spread. DNS changes are not instant, because the update must spread across the internet. Check back later instead of changing settings repeatedly.
- Check that SSL is active. SSL is the certificate that gives your site the padlock and https address. Hostinger lists a free SSL certificate installed automatically on every plan. Visit your site and confirm the padlock. [VERIFY: SSL status in hPanel after the domain connects]
- Install your website. Hostinger lists a 1-click WordPress installer and an auto-installer for more than 100 apps. Install WordPress from hPanel and log in to your new dashboard.
- Apply basic security settings. Use a strong, unique password, and keep WordPress, themes, and plugins updated. Hostinger lists malware scanning, IP and country blocking, and domain privacy on every plan. Confirm how often your plan backs up your site.
Once the site loads over https, test the pages that matter: your home page, your contact form, and, for stores, checkout. Fix problems now, before you promote the site.
| Problem | Likely cause | What to do |
| Site does not load | Nameserver change has not spread yet, or nameservers are wrong | Recheck the nameservers you entered, then wait before trying again |
| Browser shows an SSL warning | Certificate not issued yet, or the domain is not connected | Confirm the domain points to your host, then check SSL status in hPanel |
| Old site still appears | Your device or network has cached the old address | Try another device or network, or clear your cache |
| Email does not work | Mail records do not match the new nameservers | Review your mail records in the DNS settings |
Which Hosting Plan Fits You? WordPress, Beginners, and Small Businesses
| For most beginners, a shared plan with WordPress tools and free SSL is enough. Upgrade to a higher tier for daily backups, more sites, or more traffic. The right plan depends on how many sites you run, expected traffic, and how much you rely on backups. |
This comparison uses five criteria: number of sites, backup frequency, storage, expected traffic, and price including renewal. It is a fit-based guide using Hostinger’s published plan details, not a speed test. Details checked October 26, 2026.
| Plan | Key limits (Hostinger page) | Best for | Not ideal for |
| Single | 1 website, 10 GB SSD, weekly backups | One simple site or a first project | More than one site, or daily backups |
| Premium | 3 websites, 20 GB SSD, weekly backups, free domain for 1 year | A blog, portfolio, or small business site | Stores or client sites needing daily backups |
| Unlimited | Unlimited websites (fair usage), 50 GB NVMe, daily backups with easy restore | Several sites, client work, small stores | The lowest upfront cost |
| Cloud Startup | Unlimited websites, 100 GB NVMe, daily and on-demand backups | Agencies and busy projects | Small first sites, because renewal is ₹1,599 a month |
Affiliate disclosure: Digi Arun may earn a commission from the links above at no extra cost to you.
Hostinger describes Single as suited to beginners and simple projects, Premium to creators and small brands, Unlimited as a complete solution for long-term projects, and Cloud Startup as dedicated power for agencies or high-traffic projects. Treat these as the provider’s own descriptions, and test them against your criteria.
All four plans list WordPress as a build option, so WordPress owners can start on any of them. Choose by the criteria above: for one personal site, Premium covers up to three sites; for a store or several client sites, backup frequency and storage matter more.
For WordPress sites, Hostinger lists LiteSpeed, object cache, automated updates, and a 1-click installer. These features save setup time but do not replace good habits such as regular updates and backups. Use these simple rules:
- One simple site and a tight budget: Single or Premium, if you can accept weekly backups.
- Several sites or client work: Unlimited, because it lists unlimited websites and daily backups.
- A busy store or agency workload: compare Cloud Startup with other cloud or VPS options.
| Who should not choose Hostinger You cannot prepay a long term. The lowest prices need a 48-month upfront payment, and all plans are paid upfront.You want the renewal price to stay close to the first-term price. Shared plan renewals run ₹289 to ₹649 a month.You need daily backups on the cheapest tier. Single and Premium list weekly backups.You need dedicated resources for a busy store. Look at cloud or VPS plans, from any provider.Alternatives to compare by the same criteria: a WordPress-focused managed host, or an all-in-one domain and hosting provider. Providers such as Bluehost India, GoDaddy India, and MilesWeb are worth checking on their own pricing pages. |
Common Mistakes to Avoid When Buying Hosting
| The costliest hosting mistakes are ignoring the renewal price, prepaying a long term without checking refund terms, buying unneeded add-ons, and skipping backups. Check the full-term total, renewal rate, and cancellation terms before paying, and write each number down in one place. |
None of these mistakes is fatal, but each one costs money or time. Most come from the same cause: buying on the headline price. The fixes are simple and take only minutes before you pay. Compare at least two providers on the same criteria before you buy.
- Ignoring renewal pricing. The first-term price is the discounted one. Write down the renewal rate before you pay.
- Prepaying without reading refund terms. A 48-month payment is a big commitment, so read the refund policy first.
- Forgetting GST. Hostinger lists prices without GST, so budget for a higher final total.
- Accepting add-ons you do not need. Review the order summary and untick extras.
- Trusting “unlimited” blindly. Unlimited features sit under a fair usage policy, so check the limits page.
- Skipping backups. Cheaper tiers list weekly backups, so keep your own copy of important content.
- Buying too big or too small. An oversized plan wastes money, and an undersized one limits growth. Match the plan to your site count, storage, and backup needs.
- Not saving your records. Keep your invoice, renewal date, and login details in one safe place.
[Source: Which Hostinger Plan Should You Choose?]
How We Evaluated This Guide and Affiliate Disclosure
This guide explains how information was gathered, which prices were checked and when, and that Digi Arun may earn a commission if you purchase through affiliate links on this page, at no extra cost to you.
- Sources checked: Hostinger India’s live web hosting page, including pricing structures, plan details, FAQs, and payment and refund references, checked on October 26, 2026. Third-party price reviews often contradict one another, so all figures and plan limits cited here come directly from official provider data.
- What was and was not tested: This guide provides a structural framework and cost analysis based on published vendor specifications. It does not include proprietary third-party speed tests or uptime benchmarks, as those metrics vary by server load and configuration.
- Update schedule: Pricing and plan details are periodically re-checked, and the last-updated date at the top of the article is revised with each check.
- How recommendations are made: Hosting plans are matched against explicit criteria—such as site count, backup frequency, storage tiers, expected traffic, and renewal-inclusive total cost. No provider or plan is labeled “best” without evaluating these criteria and a corresponding timestamp.
Affiliate and Regulatory Disclosures
- Hostinger Affiliate Terms: Digi Arun is an independent affiliate partner of Hostinger. Per affiliate guidelines, links to Hostinger utilize tracking parameters, and qualifying purchases generate a commission for this site at no additional cost to the buyer.
- ASCI & CCPA Compliance: In accordance with the Advertising Standards Council of India (ASCI) guidelines for digital media and consumer protection regulations under the CCPA, all affiliate links on this page are clearly disclosed upfront. Disclosures are placed where readers can see them immediately before engaging with affiliate links, ensuring full transparency regarding commercial relationships. [SOURCED]
Frequently Asked Questions (FAQ’s)
Choose the hosting type you need, compare plans by total cost including renewal, pick a billing term, add or connect a domain, create an account, and pay. After payment, open the control panel, point your domain to the host, and install your website platform such as WordPress.
Often yes, but your site only becomes publicly reachable once a domain points to it. On Hostinger India, the Premium, Unlimited, and Cloud Startup plans include a free domain for the first year when you buy a yearly or longer plan, so you may not need to buy one separately.
On Hostinger India, shared plans cost ₹69 to ₹199 per month on a 48-month term, checked October 26, 2026, before GST. Renewal is higher, from ₹289 to ₹649 per month. Compare the upfront total and renewal rate on each provider’s own page, because prices change during sales.
For most new WordPress sites, a shared plan with one-click WordPress install, free SSL, and regular backups is enough. Choose managed WordPress or cloud hosting if you need staging, daily backups, or higher traffic capacity. Match the plan to your site count, traffic, and backup needs.
It can be for small, low-traffic sites, but low prices often come with long prepaid terms, higher renewals, and resource limits. Check backup frequency, support options, and refund terms rather than judging by price alone, and upgrade the plan if your site slows down under traffic.
A beginner-friendly host offers easy setup, one-click WordPress, free SSL, clear renewal pricing, responsive support, and a simple upgrade path. Start with the basic shared tier that fits your needs and upgrade only when traffic, backups, or the number of sites requires it.
Point your domain’s nameservers to the ones your host provides, or add the host’s DNS records at your registrar. Changes take time to spread, after which you confirm SSL and install your site. If both are with the same provider, the connection may be automatic.
Not necessarily. Longer terms usually give the lowest monthly rate but require paying the whole term upfront, and renewal is higher afterwards. Hostinger lists monthly payment as an option but recommends longer plans for value. Check the refund policy for your chosen term before paying.
Often, yes. Many providers advertise a discounted first-term price and renew at a higher published rate. On Hostinger India, Premium renews at ₹449 a month after a ₹139 first term, checked October 26, 2026. Calculate the total cost over three to four years before buying.
Most providers let you move to a higher shared tier, or to cloud or VPS hosting, as your site grows. Hostinger’s page says you can upgrade to cloud hosting when you need more power. Confirm how billing and migration are handled before you buy.
Conclusion: Choose by Total Cost and Fit
| Pick the hosting type that fits your site, compare the total cost including renewal, buy the term you are comfortable committing to, then connect your domain and launch. Keep a note of your renewal date and rate so the next bill never surprises you. |
In short: check, compare, buy, connect. Write down the upfront total and the renewal rate before you pay, and keep your own copy of important content. Use the checklist above to stay on track, and revisit this guide when your renewal approaches, because comparing again is the cheapest way to avoid an expensive renewal.